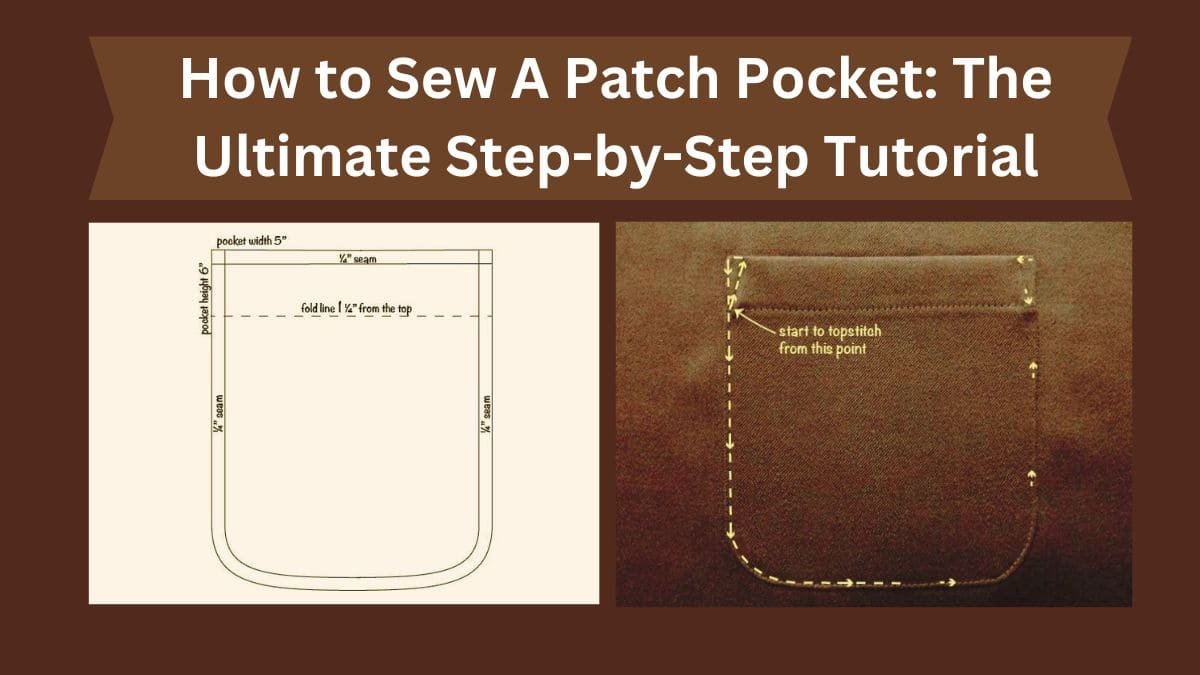
Adding a patch pocket to your garment can elevate its style and functionality. Whether you are enhancing a favorite piece of clothing or creating something from scratch, sewing a patch pocket is an accessible and rewarding skill. In this guide, we’ll walk you through 11 straightforward steps to sew a patch pocket, along with expert tips and insights to achieve professional results.
What is a Patch Pocket?
A patch pocket is a simple pocket sewn directly onto the outside of a garment. It’s a versatile detail often found in dresses, jackets, and shirts. This guide will teach you how to easily sew a patch pocket, allowing you to customize your clothing with creativity and practicality.
Patch pockets are popular for their simplicity and versatility. They can be decorative or highly functional, making them a favorite choice for both beginners and seasoned sewers. Whether you’re looking to add a subtle touch to your garment or create a bold statement with contrasting fabrics, patch pockets offer endless possibilities.
Benefits of Adding Patch Pockets
- Functionality: Patch pockets provide convenient storage for small items like keys, phones, or even a handkerchief.
- Aesthetic Appeal: They can enhance the look of a garment, adding symmetry or visual interest.
- Customization: Patch pockets allow you to personalize your clothing with unique designs, patterns, or fabric combinations.
- Beginner-Friendly: They are one of the easiest pocket styles to sew, making them perfect for new sewers.
Tools and Materials You Need
To sew a patch pocket, you’ll need a few basic materials and tools. Here’s a list:
Materials:
- Fabric for the Pocket: Choose a fabric that matches or complements the fabric of your garment.
- Thread: Pick a thread that matches the fabric color for a neat finish.
- Interfacing (optional): This is used to add structure to the pocket, particularly for heavier fabrics or if you want extra durability.
Tools:
- Scissors: To cut the fabric.
- Pins or Fabric Clips: To hold the pocket in place while sewing.
- Needle or Sewing Machine: For stitching the pocket onto the garment.
- Iron: For pressing the fabric and ensuring smooth edges.
- Measuring Tape or Ruler: To measure and position the pocket properly.
Step-by-Step Patch Pocket Tutorial
You’ve sewn the shirt or pants, and now it’s time to add a patch pocket. Here’s a step-by-step guide to help you do that:
-
Drafting a Patch Pocket Pattern
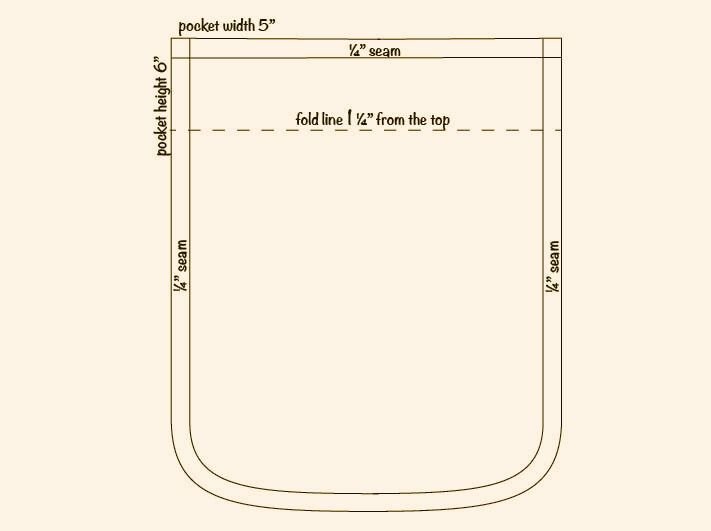
Creating a proper patch pocket pattern ensures your pocket is functional and attractive.
- Use paper or lightweight fabric to draft your pattern. A typical size is 8.25 inches wide by 10 inches tall but adjust based on your garment.
- Add seam allowances: 5/8 inch on the bottom and sides, and 1.5 inches for the top fold.
- Confirm alignment with your garment’s proportions for pre-made patterns like the Sylvie Dress Pattern.
Pro Tip: Fold your template in half to ensure symmetry. Accurate drafting makes for a better pocket.
-
Cut the Pocket Fabric
Cutting accurately is vital for a clean finish.
- Select a fabric that complements your garment. For a bold look, use a contrasting pattern.
- Ensure precise cuts along the grain or bias for durability or decorative effects.
Pro Tip: Use sharp fabric scissors for clean edges. Rotary cutters are also excellent for precision, especially with thicker fabrics.
-
Mark the Fold Line

Marking the fold line is key to a polished top edge.
- Measure and mark 1.25 inches from the top edge of your pocket fabric.
- Draw a line across to indicate the fold.
Pro Tip: Use a ruler for straight lines, especially on patterned fabrics. Tailor’s chalk or a washable fabric pen ensures your markings won’t leave permanent stains.
-
Fold and Pin the Top Edge
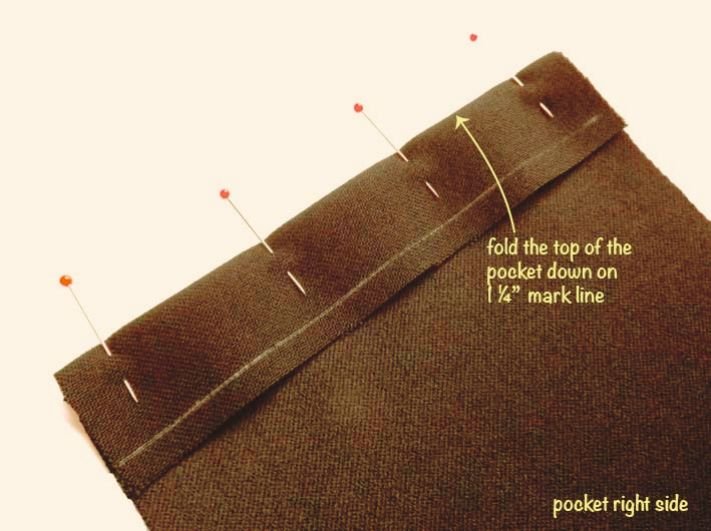
Folding creates a neat hem and prevents fraying.
- Fold down to the marked line and pin securely. Use fine pins to avoid damage.
- Press lightly with an iron for best results.
Pro Tip: Pressing at this stage ensures crisp edges and makes stitching easier later on.
-
Stitch the Pocket Top Edge

Secure the hem with topstitching for strength and aesthetics.
- Sew a straight line along the fold. Choose matching or contrasting thread for added design.
Pro Tip: Sew slowly for precise results, especially on visible seams. For added durability, consider double-stitching the top edge.
Related: How to Sew with Needle and Thread: A Step-By-Step Guide
-
Trim and Snip Corners
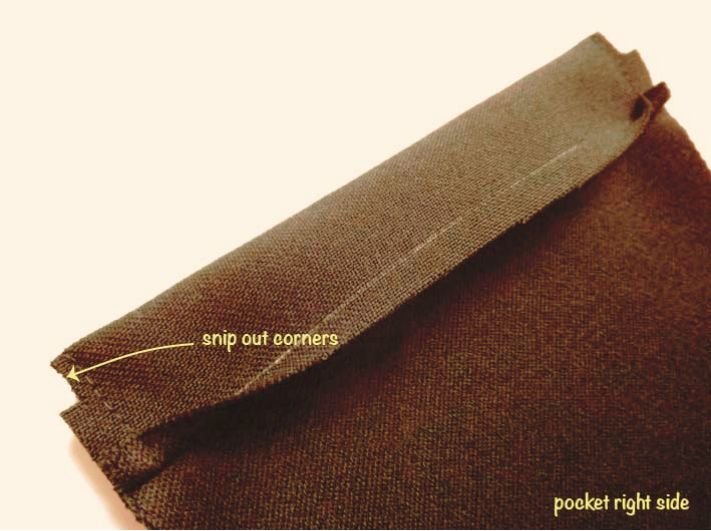
Reduce bulk by trimming corners.
- Cut the excess fabric at the upper corners diagonally close to the seam, but avoid cutting through it.
Pro Tip: Use sharp scissors for detailed trimming. If you’re working with delicate fabrics, consider using pinking shears to prevent fraying.
-
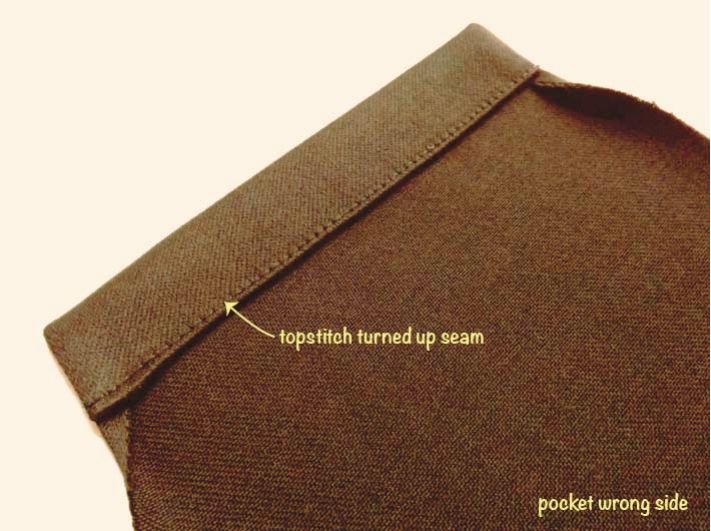
Turn and Press the Top Edge
Turning and pressing shapes the pocket.
- Turn the top hem to the right side, ensuring sharp corners. Use a point-turner for accuracy.
- Press the seam flat for a crisp look.
-
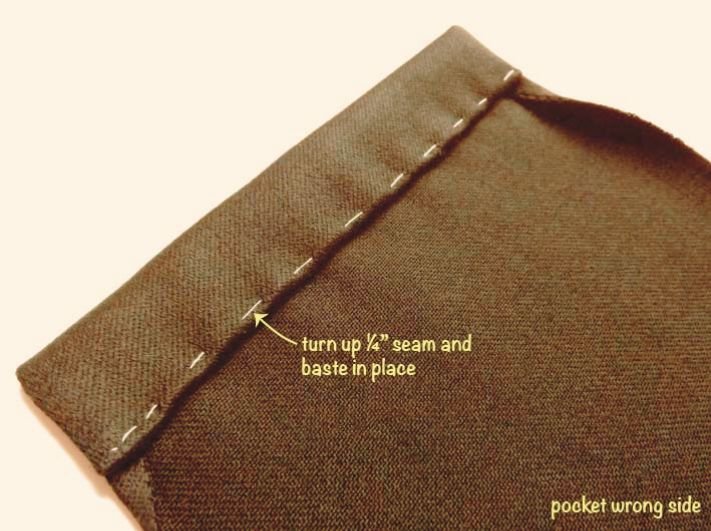
Press the Sides and Bottom
Prepare the edges for smooth attachment.
- Fold the sides and bottom inward along the seam allowance (5/8 inch).
- Press these folds flat, rolling the stitch line slightly inward to conceal it.
Pro Tip: Use fabric clips for thick fabrics to prevent distortion. This also avoids pin holes in more delicate materials.
-
Baste the Edges
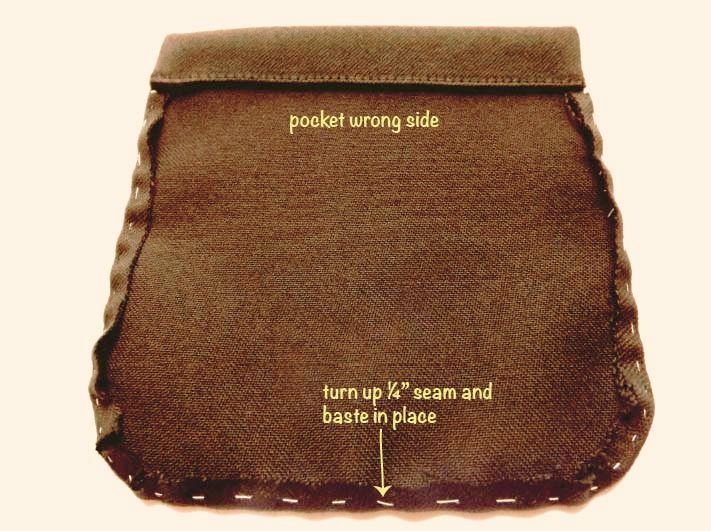
Basting ensures stability during stitching.
- Temporarily hand-stitch the folds in place. Remove pins before machine sewing.
Pro Tip: Double-baste corners for extra security. This step is particularly helpful when sewing with slippery or stretchy fabrics.
-
Position and Pin the Pocket
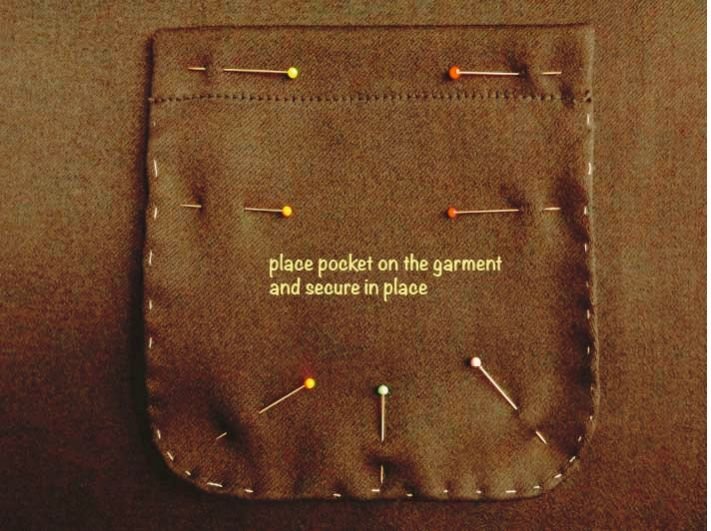
Placement is crucial for functionality and style.
- Position the pocket symmetrically. Use a ruler for accuracy.
- Pin the pocket securely.
Pro Tip: Try on the garment with the pocket pinned to confirm placement. This ensures the pocket is both practical and visually appealing.
-
Topstitch the Pocket
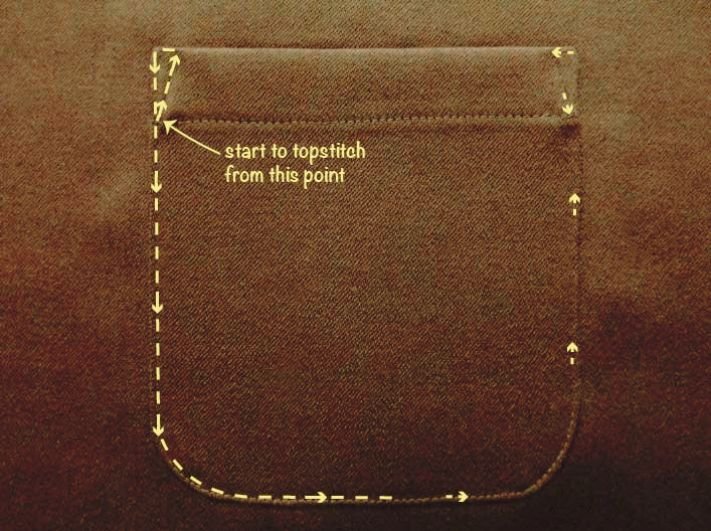
Attach the pocket with topstitching.
- Start at the top corner, sew down one side, across the bottom, and up the other side.
- Reinforce the top corners with backstitching or a triangle stitch.
Pro Tip: Use a 1/8-inch seam allowance for a professional finish. For added flair, consider decorative stitches or contrasting thread.
Pro Tips for Perfect Patch Pockets
- Fabric Choice: Match the pocket fabric to your garment for consistency.
- Reinforce Strength: Add interfacing to prevent sagging.
- Creative Design: Experiment with contrasting colors or patterns for decorative pockets.
- Use Quality Tools: Invest in sharp scissors and a reliable sewing machine.
- Practice Makes Perfect: Start with scrap fabric to perfect your technique before sewing on your garment.
Common Uses for Patch Pockets
- Dresses: Add functionality without sacrificing style.
- Shirts: Achieve a laid-back, casual vibe.
- Jackets: Provide convenient storage.
- Children’s Clothing: Make playful and colorful designs to delight little ones.
- Home Projects: Use patch pockets on aprons, bags, or cushion covers for added utility.
Advanced Pocket Design Variations
For those ready to take their pocket sewing skills to the next level, here are some design ideas:
- Rounded Pockets: Create curved edges for a softer look.
- Double Pockets: Layer two pockets for added functionality.
- Decorative Topstitching: Use embroidery or decorative stitching to add a unique flair.
- Contrasting Lining: Add a pop of color by lining your pocket with a different fabric.
Final Words
FAQs: How to Sew a Pocket
What type of fabric is best for sewing pockets?
Choose a fabric that complements the weight and texture of your garment. Lightweight cotton works well for casual wear, while heavier fabrics like denim or canvas suit utility clothing.
Do I need a particular sewing machine to sew pockets?
While a primary sewing machine can handle most pocket sewing tasks, having a machine with a free arm feature can make it easier to maneuver around smaller pockets, like those found in pants or skirts. Additionally, a machine with multiple stitch options can add decorative flair to your pocket designs.
Should I pre-wash the fabric before sewing the pockets?
Yes, it’s advisable to pre-wash the fabric to account for any shrinkage that may occur. This ensures that your finished pockets maintain their shape and size after the garment is laundered.
What are some creative ways to customize pocket designs?
Consider adding embellishments such as contrasting fabric trims, decorative stitching, or embroidery to personalize your pockets. You can also experiment with different shapes and sizes to create unique pocket styles.
How can I ensure the pockets are securely attached to the garment?
To ensure durability, reinforce the pocket edges by backstitching at the beginning and end of each seam. For extra security, consider topstitching around the pocket edges or adding bar tacks at stress points.
Can I sew a patch pocket by hand?
Yes, use a backstitch or slipstitch for durability—perfect for delicate fabrics.
What is the best stitch for patch pockets?
A straight stitch provides strength and a clean finish. For extra durability, consider adding a zigzag stitch along the edges before folding.
How do I ensure symmetry for dual pockets?
Measure carefully and use fabric markers for precise placement.